Some Tips on Interior
Trimming Eric
MaLossi
While my car was off the road for painting I though I would take the time to redo some of the interior which a PO had done, but were to my critical eye not up to snuff. I did the center console and had enough vinyl left over that I decided to do the A-post pillars. Little did I know that these are the two hardest components to trim. Trust me, it’s not like wrapping Christmas presents. After some trial and error, I was able to figure out a few tricks that made the process a bit easier, and I decided to write them up for posterity.
First the radio console. I’m not sure whether the face was originally trimmed in leather, or vinyl but the kit came with a leather panel so that is what I used. Problem one, the leather is 3 or 4 times the thickness of vinyl. This makes it quite difficult to bend and fold, and it doesn’t blend at all when you have to butt it up against vinyl. Here’s what you do:

If you don’t yet own a Dremel tool, here’s the excuse you need to buy one. A sanding drum works a charm on the back side of leather to trim it down to a manageable thickness. Here I’m sanding away at the back of the flap that will need to fold behind the top rung of the radio console. As you can see it makes a nice mess of things, so if you don’t yet have an air compressor, here’s the excuse you need to get one of those too. The leather sands so slowly that unless you hold it one place and really bear down there isn’t any danger of burning through. Just don’t slip and let the drum hit the face of the leather as that will most certainly ruin it. Keep sanding away until it’s roughly the thickness of vinyl.
This same method was used to pare down the sides of this panel where they fold over and glue down. Ditto for the main panel of the tunnel console where the leather has to fold under the bottom of the wood. Failure to do this will significantly increase the overall thickness, and will in all likelihood prevent your fuse panel from dropping properly.
Problem two:
This hint will apply to any panel you are trimming. How does one deal with corners? This was my main complaint with the PO’s job. The corner of each object could be plainly seen through the trim. This was as a result of just cutting out a square from the corner of the trim panel and then trying to make it look like a picture frame joint. It doesn’t work. Here’s how it should be done:
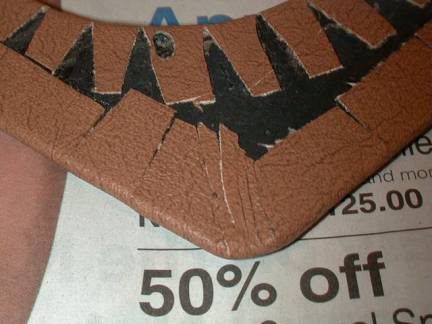
Notice the fine tails. This is an example of a curve with a slight radius; however the same method should be used with a square corner. In that case you’d just make one thin tail whose sides are on either side of the corner vertex. When you pull that snuggly over the pointed corner it will bulge out over the point and conform nicely. Then trim the sides so that they meet in a nice miter with the “tail”. If done carefully the underlying object is completely hidden under the trim. Here is one before it was folded over and glued down:
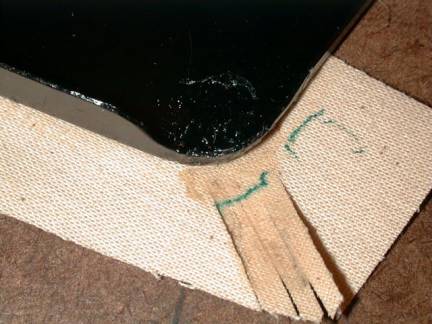
Here’s a completed side panel viewed from the rear. Notice how many slices are necessary to complete the radius around the speaker hole. Bear in mind, these jobs take a painfully long time to complete so you should have something pleasing to look at to take your mind off it:
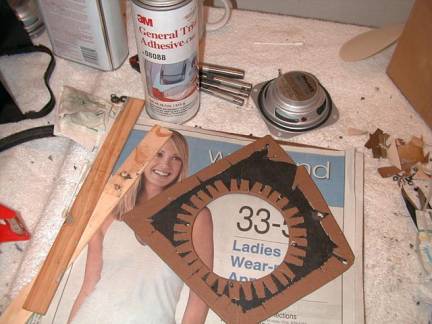
You can also see here the glue I used for vinyl and leather pieces, 3M 08088. This glue contains a strong solvent which penetrates deeply. When spraying on vinyl use two light coats allowing enough time for the solvent to evaporate between coats. If you look at the front side and it appears wet and shiny, you are in immanent danger of ruining the panel as too much solvent is soaking through. For this same reason you don’t want to get this glue anywhere near foam. They make a different non-penetrating glue for this purpose, 08074. Both are available off the shelf from NAPA.
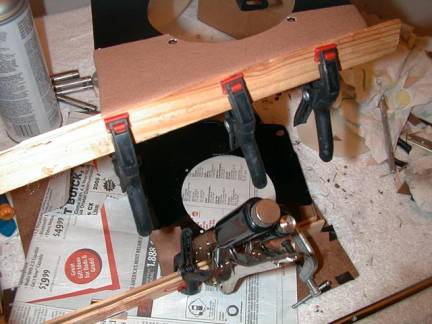
You can never have too many clamps and wood paint stirrers. Never, ever clamp directly to the vinyl. You will leave a permanent mark. Some vinyl won’t even tolerate this degree of clamping without distorting. Experiment before working on your good piece. Notice my array of punches off to the side. By all means punch out all of the screw holes beforehand. It’s annoying to try to carve out a hole later, and it’s much tidier this way.
I mentioned earlier how I thinned out the leather for the front panel where it folds over the sides. I didn’t have enough leather to trim the lower part of the console sides which you see me working on here. Therefore I trimmed that in vinyl and butt the leather up against it where it folds over the side. As long as you pare down the leather it will transition very nicely, and appear quite deliberate. Here’s a shot of the finished piece minus the ashtray panel:
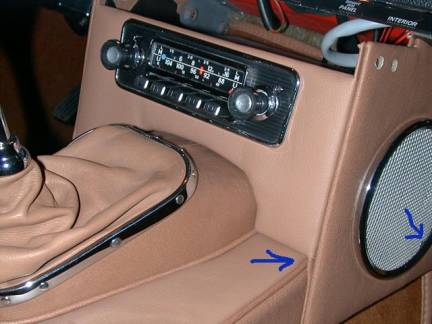
Notice the butt joint mentioned earlier. Also notice the arrow to the right. That is pointed to something that you’ll likely either not know about or forget about and you’ll be cursing the first time you turn on the radio. There were originally some little rubber buffers over the screw posts on these speaker covers between the cover ring and the grill to prevent vibration. If you don’t have them a small slice of rubber tubing will do nicely. The radio will sound crappy enough as it is. No sense in making it even worse.
To those with an even more critical eye than mine, you’ll notice a couple of tiny waves under the radio. What can I say, I don’t get paid to do this, and this is the first time I even noticed it. I think the flash is exaggerating it.
I don’t know if there was ever beading between the radio consol and the tunnel console. I’ve never seen a photo of an original car that had it, and I know that if I put one in there the fuse panel wouldn’t stand a prayer of opening so I did not use it. It was a tough decision, but it was mine, and I stand by it.
Next on the list of most difficult parts to trim, the cubby box. I bollixed this twice before finally getting it right. First I tried to glue down the outside and then fold it over to the inside, which left me with hopeless bulges inside. Strike one piece of vinyl. Next I tried to begin by gluing down the inside but I made the mistake of spraying the entire inner wall with glue, and it was all too difficult to manage and I again made a hopeless mess of it. The third time was a charm. I started at the back, making certain to leave enough on the top and bottom edges. I spayed and glued down only one side at a time, being careful to ensure:
· that it was worked well into the corners
· that I wasn’t going off course and would be left with enough to pull down over the front
· that I allowed enough time for it set up before continuing on.
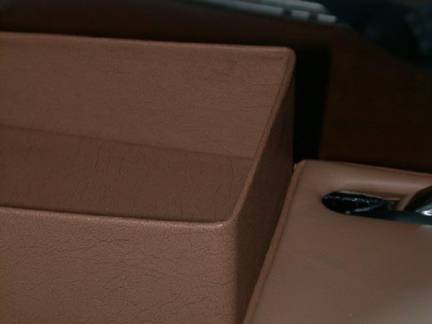
I then pulled it over the outer face like a sock. It was very tight, and I was afraid that if I used glue on the outer face it would get stuck. So I pulled it over dry. There were a few minor bulges on the front, so those got glued down afterwards. I left enough at the bottom so that the inner and outer vinyl could be pulled tight and glued together. It sticks to itself better than it sticks to metal. The result is completely free of bulges and bumps:
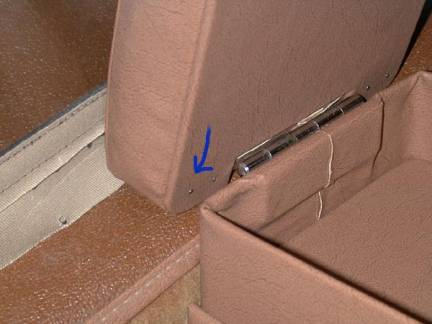
There was some debate about how this lower panel attached to the bottom of the lid. I was told by a pro that there were little brads at the rear, and in the front the screws for the plastic stop hold it on. Here you see the brads, though normally you’d never notice them.
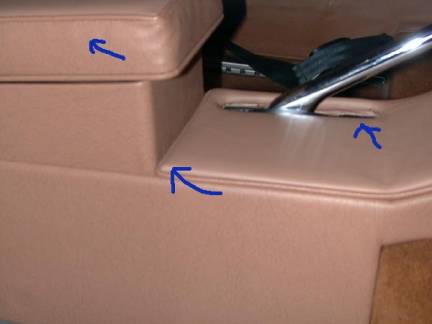
Here are the two main difficulties with the tunnel console. Make sure that you trim out the brake handle hole first. This will leave you with some wrinkles but by pulling from the edges you can straighten it out again. If you cut and glue down the sides first you’ll not have enough to complete the hole as leather doesn’t stretch as much as vinyl.
Second is the beading where it goes around the rear. The bead wants to slip down to a level lower than the sides, which looks pretty crappy. I cut another piece of beading and put it under the real one back there to prop it up. Once you screw down the cubby, the dummy one can’t be seen and the beading looks very tidy:
I also had a real pain with the cubby lid trim panel. There was a line going around the edge near the top where three layers of material were stitched together and could be seen poking through the sides. I cut three strips of sill foam and glued them to the main foam block. They were trimmed so that they came up to just where that stitched seam hung down to. Sorry I don’t have a photo. The idea was that I couldn’t stop the seam from poking at the outside, but I could minimize the effect by putting foam in the area beneath that to take up the space that was created by the seam if that makes sense at all. Anyway you can see that it was more or less effective because you can hardly see that line going around the edge.
And now the vote for the biggest pain in ass to trim goes to, the A-pillar posts. I’m embarrassed to say that each of these took me about 5 hours to trim. I couldn’t believe how hard they were. Here’s the problem, you have one 90 degree bend to the side at the very same spot where you have a 15 or 20 degree bend along the other axis. It’s hard to imagine that it’s even possible to stretch a single piece of vinyl in this manner, but it is. First things first, make sure you do a trial fit of the part on the car. Once on, tape down the clips with electrical tape. This will make the part easier to fit later as the clips will be in the right place. It will also help camouflage the clips so they are less evident under the vinyl. Be sure to also trial fit the little semi-circular chrome bits, and the pie shaped piece that make the transition into the dash. These are more than a little fiddly to get right, with lots of bending and cursing and cries of, “This can’t possibly fit,” so you want to make it so it will go together later with a minimum of fuss.
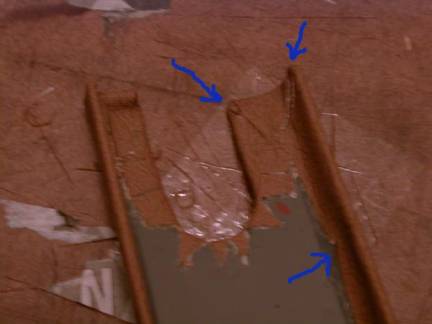
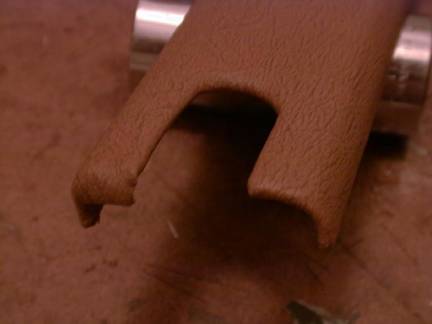
Step one; lightly glue the foam to the face of the pillar, and I do mean lightly. You just want to keep it from sliding around while you stretch the vinyl over it, and remember not to use the penetrating glue. So where do you start to glue down this monster? You’ll be tempted to start with one of the easy parts like the long straight stick, or the bottom. Resist this temptation or you are doomed. The only way I found that I could make it work was to start with this radius:
Even with this as your starting point you are still going to be left with huge wrinkles and you’ll be pulling your hair out trying to figure out how to stretch them out, but you have to think positively. Just keep experimenting with pulling against the bottom, the other side and the top, and you’ll gradually figure it out. Unlike other less complex panels, don’t count on gluing a side down and being done with it. You’ll likely have to keep loosening up tabs and alternately tugging on them until all of the wrinkles are out.
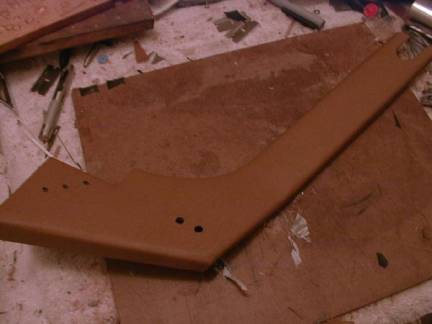
Sorry I can’t be more specific, but frankly I tugged and pulled and stretched from so many angles that I can’t remember the sequence that finally worked. Besides, I wouldn’t want to deprive you of all the fun. Here’s a view from the back:
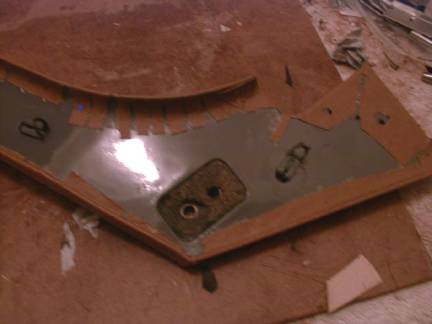
I should’ve also shown the back side as it extends upward. Normally on a straight edge like this you can simply fold over and glue down. However on this part due to the amount of tugging and stretching involved I had to remove a 10 degree notch every inch or so, and when it was finally glued down, most of those notches couldn’t be seen due to the stretching.
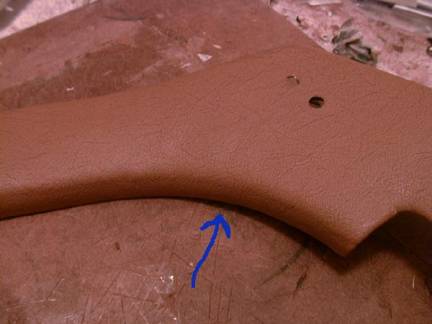
Another rough spot is this lower corner. You’ll be left with a bulge down here, and you’ll be tempted to slice it on the outside to remove material. It won’t be the end of the world if you do that, as long as you remove the exact amount necessary but it you leave this till last, and work with it a bit, you can get this to work without having to slice it up:
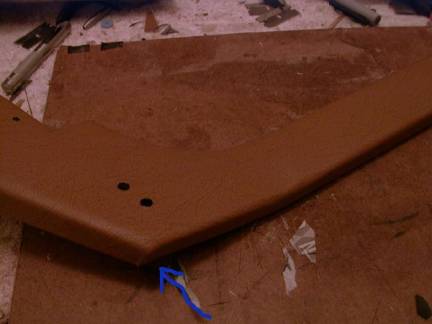
Last but not least, the top. What can I say? It’s fiddly but if you’re patient, and have a sharp X-Acto knife (don’t try to use a razor blade), it’s possible to do a near perfect job. Here’s what the back might look like. Notice the corner treatments I mentioned earlier. Also be sure to use enough glue. These tabs are quite small, and if they loosen up in the hot sun it will be a pain to take the part off to get them glued down again Once they are all correctly cut and glued you might want to go back and put some dabs of super glue or epoxy to make sure they are fixed securely:
Here’s the top front and the completed part:
The last small piece of advice I’ll offer is if you are buying a whole interior kit you might want to inquire about ordering an extra yard or two of vinyl. There are three good reasons to do this:
- It’s fairly inexpensive, perhaps $50/Sq Yd
- This job is stressful enough without having to fret over a ruined panel, or struggling to reuse a piece of vinyl from a botched attempt simply because you don’t have any to spare.
- Car interiors get worn, or have little accidents, and it’s nice to have some spare material tucked away since you’ll likely not be able to get an exact match for it five years later.
Good Luck